
An Introduction to Pastels- 6 Week Course
Learn How to Create Beautiful Pastel Paintings
Class Begins January 14 and Ends on February 22.
Last day to register is Friday, January 11.
What This Course Includes:
- 6 Weekly Video Demos (these are yours indefinitely to view!)
- Accompanying Lesson Step-by-Step Instruction Guides with additional "Try This" exercises (also yours indefinitely-- not just the duration of the class)
- Participants can opt in to a Private Class Facebook Group with weekly support check-ins and opportunities to show your work.
- Email Support for questions or help along the way
Your Instructor
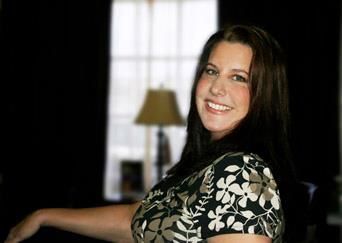
Jennifer McCall is a fine artist who has an extensive career of working with many forms of media-- pastel, watercolors, oils and much more! She creates paintings for clients nationally, including portraits and landscapes. She also is an award-winning graphic designer and marketing specialist who has worked for Fortune 500 companies as well as smaller organizations to help build their brand. She lives in Tifton, Georgia with her family and her three favorite, furry studio assistants.
Course Curriculum
-
StartLESSON 6 - Downloadable Guide
-
StartLESSON 6 - VIDEO 1 : Starting Out (1:16)
-
StartLESSON 1 - STEP 1: Starting Out
-
StartLESSON 6 - VIDEO 2: Underpainting to Tone Our Surface (1:24)
-
StartLESSON 6- STEP 2: THE UNDERPAINTING
-
StartLESSON 6 - VIDEO 3 - SKETCHING IT OUT (5:55)
-
StartLESSON 6 - STEP 3: SKETCHING IT OUT
-
StartLESSON 6 - VIDEO 4: Painting the First Layer
-
StartLESSON 6 - STEP 4 - Painting the first layer
-
StartLESSON 6 - VIDEO 5: Mark-Making and More (15:16)
-
StartLESSON 6 - STEP 5: Mark Making and More
-
StartLESSON 6 - VIDEO 6 - Painting the figure (1:51)
-
StartLESSON 6 - STEP 6: Painting the figure
-
StartLESSON 6 - VIDEO 7--Painting the flesh (8:16)
-
StartLESSON 6 - STEP 7: Painting the flesh
-
StartLESSON 6 - VIDEO 8 -Adding depth to the flesh (24:47)
-
StartLESSON 6 - STEP 8 -Adding depth to the flesh
-
StartLESSON 6 - VIDEO 9 - Working on the Details (9:57)
-
StartLESSON 6 - STEP 9 - Working on the Details
-
StartLESSON 6. - VIDEO 10 - FINISHING UP (0:36)
-
StartLESSON 6 - STEP 10: Finishing Up
-
StartLESSON 6 - Reference Photo
-
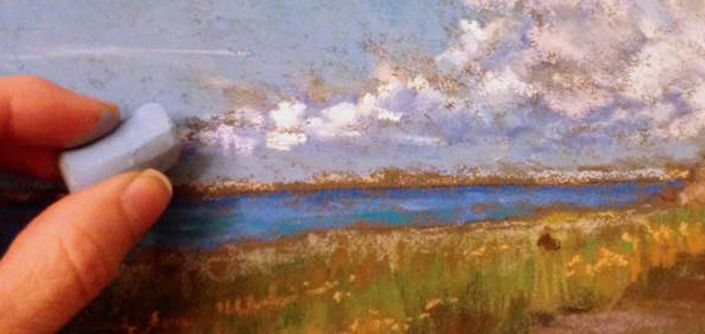
StartWhat is Atmospheric Perspective?
-
StartLESSON 5 - REFERENCE PHOTO
-
StartLESSON 5 - VIDEO 1, STEP 1 - SKETCHING (4:49)
-
StartLESSON 5 - VIDEO 2, STEP 2 - BLOCKING IN (1:26)
-
StartLESSON 5 -VIDEO 3, STEP 3 - UNDERPAINTING THE CLOUDS AND THE SKY (1:15)
-
StartLESSON 5 -VIDEO 4, STEP 4 - PAINTING THE MOUNTAINS (1:06)
-
StartLESSON 5 -VIDEO 5, STEP 5 - UNDERPAINTING THE MOUNTAINS (1:51)
-
StartLESSON 5 -VIDEO 6, STEP 6 -PAINTING IN THE SKY AND CLOUDS AGAIN (3:09)
-
StartLESSON 5 -VIDEO 7, STEP 7 - UNDERPAINTING SOME MORE (2:20)
-
StartLESSON 5 -VIDEO 8, STEP 8 - ADDING THE BLUE SKY BACK IN AND LIGHTENING THE CLOUDS (3:19)
-
StartLESSON 5 - VIDEO 9, STEP 9 - PAINTING THE HORIZON AND CLOUDS (2:27)
-
StartLESSON 5 - VIDEO 10- STEP 10- MOUNTAINS IN DISTANCE AND CLOUD HIGHLIGHTS (6:29)
-
StartLESSON 5 - VIDEO 11- STEP 11 -DEFINING DISTANT MOUNTAINS (1:28)
-
StartLESSON 5 - VIDEO 12- STEP 12: LITTLE DETAILS IN THE DISTANCE (6:07)
-
StartLESSON 5 - VIDEO 13- STEP 13: MIDDLE AND FOREGROUND MOUNTAINS (2:33)
-
StartLESSON 5 - VIDEO 14, STEP 14: FINISHING UP (4:47)
-
StartLESSON 5 DOWNLOADABLE GUIDE
-
StartLESSON 4 - INTRO: What is a Nocturne?
-
StartLESSON 4 REFERENCE PHOTO
-
StartLESSON 4 - VIDEO 1 Sketching It Out (1:54)
-
StartLESSON 4: STEP 1: Sketching It Out
-
StartLESSON 4 - VIDEO 2 Blocking in the Sky (2:31)
-
StartLESSON 4 - STEP 2: Blocking in the Sky
-
StartLESSON 4 - VIDEO 3: Painting the Trees (7:50)
-
StartLESSON 4 - STEP 3: Painting in the Trees
-
StartLESSON 4 - VIDEO 4: The Cabin (2:18)
-
StartLESSON 4 - STEP 4: The Cabin
-
StartLESSON 4 - VIDEO 5: More Details (1:34)
-
StartLESSON 4 - STEP 5: More Details
-
StartLESSON 4 - VIDEO 6: The Final Touches (10:19)
-
StartLESSON 4 - STEP 6: The Final Touches
-
StartLESSON 4 DOWNLOADABLE GUIDE
Frequently Asked Questions
Don’t forget! This six-week Beginning Pastels Course starts Monday, January 14.
Are you excited yet? So am I! See you soon!